![]()
Setting Permissions for a Content Folder
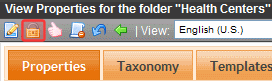
You can set permissions for any content folder and language from the Folder Properties screen. Circled below is the Permissions button on the Folder Properties screen.
See Also: Setting Permissions for Content
Assign Traverse Permissions to Folder Below Root
If the folder to which you assign permissions is not the root folder, you must grant the user Traverse Folder permission to all folders above that folder. Otherwise, the user cannot navigate to the folder. For example, consider the following folder structure.
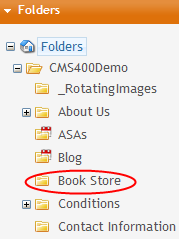
To let a user edit the Book Store folder only and no other folders, assign to him Traverse Folder permission for the two folders above Book Store: CMS400Demo and Root.
Accessing the Permissions Table
To access the Permissions Table, follow these steps.
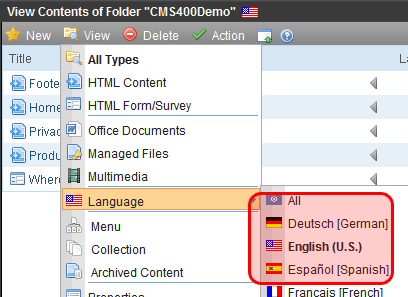
1. Select a content folder from the left frame of the Workarea.
2. Choose View > Language.
3. Select the language whose folder properties you want to update.
4. Choose View > Properties. The Folder Properties screen appears.
5. Click Permissions ( ).
).
6. The Permissions Table appears.
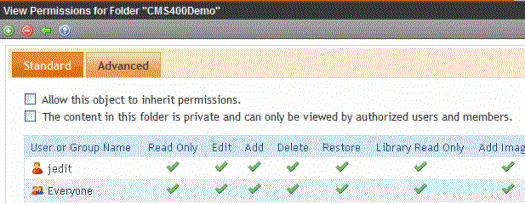
The Permissions Table displays each user’s abilities to perform actions on content within the selected folder. Since all permissions cannot fit on one screen, click the Advanced tab to see the other group.
After viewing permissions, you can change them. Below is a list of actions you can perform from this screen.
Actions You Can Perform from the Permissions Table
The following table summarizes actions available from the Permission Table screen.
|
Action |
How to perform it |
For more information, see |
|
View advanced permissions |
Click the Advanced tab |
|
|
Add user or group to permission table |
Click |
|
|
Remove user or group from permission table |
Click |
|
|
View membership users |
Click View MemberShip users |
|
|
Have this folder inherit permissions from parent folder |
Check box next to Allow this object to inherit permissions |
|
|
Make content in this folder private |
Check box next to The content in this folder is private and can only be viewed by authorized users and members Note: If Allow this object to inherit permissions is checked, you cannot check this box. In that case, this folder is inheriting this setting from its parent folder. |
See Also:
Adding a User or User Group to the Permissions Table
Editing User or User Group Permissions
Deleting Users or User Groups from the Permissions Table
Adding a User or User Group to the Permissions Table
To add a user or user group to the Permissions Table, follow these steps.
Note: Before adding users or groups, you must break inheritance. See Setting Permissions for a Content Folder.
Note: If a user and the user group to which that user belongs are both given permission to a folder, the user has all permissions to which he/she is assigned as well as permissions assigned to the user group.
Note: You can only assign Read Only permission to a Membership user or user group. See Also: Membership Users and Groups
1. Access the Permissions Table for the content folder or content, as described in Accessing the Permissions Table.
2. Click Add ( ).
).
3. The Add Permissions screen appears. Only users and groups not assigned to the Permissions Table appear.
4. Click a user or group to add to the Permissions Table.
5. The Add Permissions screen appears.
6. Check the standard and advanced permissions for the user or group. Refer to Setting Permissions for a Content Folder for a description of permission options.
Note: Check Enable All to assign all standard permissions. If you do, you still must assign advanced permissions by hand.
7. Click Save ( ).
).
Editing User or User Group Permissions
To add or remove permissions for a user or group, editing the user or group in the Permissions Table. To do so, follow these steps.
1. Access the Permissions Table for the content folder or content, as described in Accessing the Permissions Table.
2. Click the user or group for which you want to edit permissions.
3. The Edit Permissions screen appears.
4. To assign any permission, check the box. To remove any permission, uncheck the box.
Note: Remember to toggle between standard and advanced permissions.
5. Click Update ().
Deleting Users or User Groups from the Permissions Table
To remove permissions from a user or user group, use the Delete button on the View Permissions window. To do so, follow these steps.
1. Access the Permissions Table for the content folder or content, as described in Accessing the Permissions Table.
2. Click Delete ( ).
).
3. The Remove Permissions screen appears.
4. Click the user or group to remove from the Permissions Table.
5. A confirmation message appears.
6. Click OK.
Note: When you delete the permissions of a user or user group, that change is propagated to all subfolders and content. Also, if the user or group was part of an approval chain, they are removed from it.
See Also: Folder Permissions


![]()